
Finally we reached our target of implementing a Digital (addressable) LED Strip Dimmer. This project uses an Arduino UNO + a DMX Shield by Conceptinetics in order to replace the conventional DMX Dimmer used in MadMapper installations.
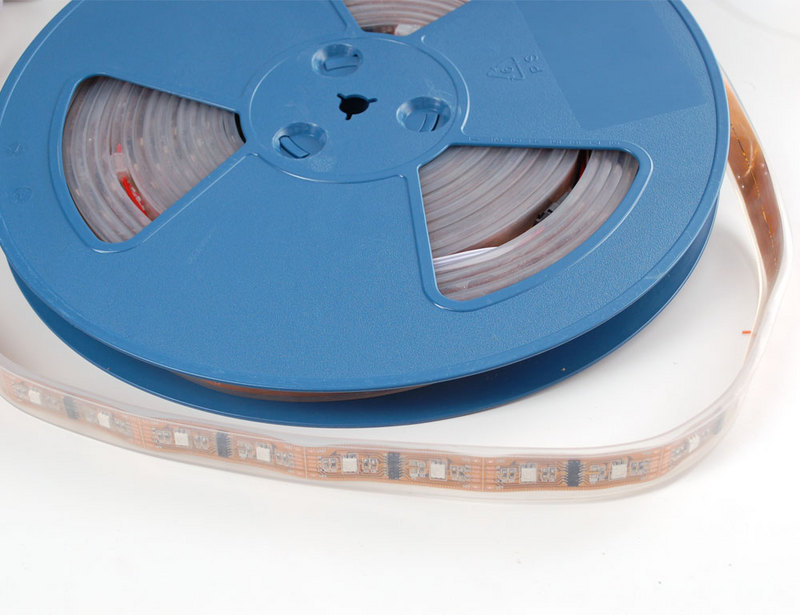
Softwares like MadMapper or Millumin (among others) offers DMX functionality to sinchronize LED Strips according to video/camera/sensor parameters. When designing a LED installations sometimes the number of necessary segments of RGB LED strips greatly increases the number of connections and length of necessary wiring (normal strips cannot manage its LEDs independently. One connection = one color). One of the possible solutions to avoid it is using addressable or digital LED strips, which can manage its LEDs segments independently only with one connection. That optimizes the number of wiring and necessary connections and reduces at the same time the possibilities of having error due to hand-made soldering.
This is the architecture used in this project:
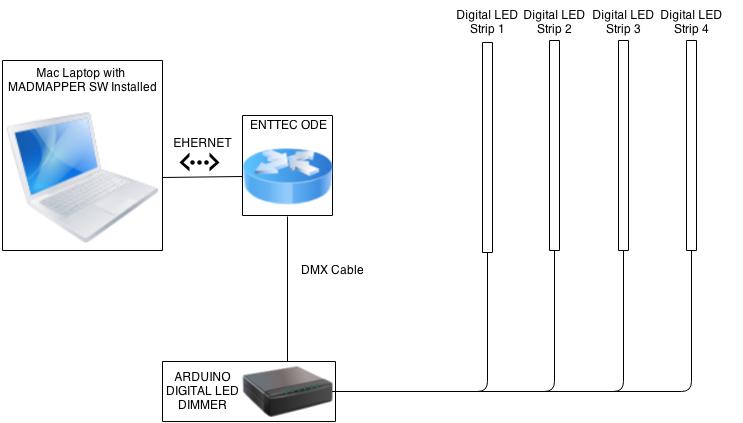
This is the usual MadMapper installation, for more information about connection layout and others, check: http://vjspain.com/blog/2013/03/10/madlight-tutorial-en-ingles/.
WARNING: NEVER Connect LED strips power lines to Arduino UNO Board. Connect power lines directly to AC/DC converter and select the right one for your power consumption. Arduino UNO is not designed for supplying high currents.
In this case, four LED bar of 10 independents segments (3 LEDs each) are controlled using this board. The code can be easily adapted for different configurations.

We have omitted including a DIP Switch traditionally used in DMX devices to select its DMX address. Our digital LED strip dimmer can be addressed via software. In our case, it is addressed to 0 channel but it can be easily modified in code.

You can download the Arduino sketch here: vjspain_DigitalLedStripDimmer.
Libraries Reference and download:
——————————————————————————————————————-
/*Kike Ramirez - vjspain.com, JANUARY, 2014Arduino based Dimmer controlling 4 bars of digital LED Strips with microcontroller WS2811. In this example, each bar contains 10 (NUM_LEDS) groups of 3 independents LEDs.
CC Creative Commons v3.0 - http://creativecommons.org/licenses/by/3.0/deed.es_ES*/ #include "FastSPI_LED2.h" #include <Conceptinetics.h>
// Number of slave DMX channels
 #define DMX_SLAVE_CHANNELS 120
// Define the channel of the device
 #define DMX_CHNLS 0
// Configure a DMX slave controller
 DMX_Slave dmx_slave ( DMX_SLAVE_CHANNELS );
// Number of independents LEDs in each strip segment
 #define NUM_LEDS 10
// Output PIN (Data LED strip connection) definition
 #define DATA_PIN1 9
 #define DATA_PIN2 10
 #define DATA_PIN3 11
 #define DATA_PIN4 12
// This is an array of leds. One item for each led in your strip. All strips must have the same number of led segments, defined by NUM_LEDS.
 CRGB leds1[NUM_LEDS];
 CRGB leds2[NUM_LEDS];
 CRGB leds3[NUM_LEDS];
 CRGB leds4[NUM_LEDS];
const int ledPin = 13;
 void setup() {
  // Initialize each segment
  FastLED.addLeds<WS2811, DATA_PIN1, RGB>(leds1, NUM_LEDS);
  FastLED.addLeds<WS2811, DATA_PIN2, RGB>(leds2, NUM_LEDS);
  FastLED.addLeds<WS2811, DATA_PIN3, RGB>(leds3, NUM_LEDS);
  FastLED.addLeds<WS2811, DATA_PIN4, RGB>(leds4, NUM_LEDS);
  // Enable DMX slave interface and start recording
  // DMX data
  dmx_slave.enable ();
 // Set start address to 1, this is also the default setting
  // You can change this address at any time during the program
  dmx_slave.setStartAddress (1);
 //
  // Register on frame complete event to determine signal timeout
  //
  dmx_slave.onReceiveComplete ( OnFrameReceiveComplete );
 }
void loop() { // Update the value of LED state for (int i = 0; i < NUM_LEDS; i++) {// LED group in i position of first bar leds1[i].r = dmx_slave.getChannelValue(3*i+1+DMX_CHNLS); leds1[i].g = dmx_slave.getChannelValue(3*i+2+DMX_CHNLS); leds1[i].b = dmx_slave.getChannelValue(3*i+3+DMX_CHNLS);
 // LED group in i position of second bar
  leds2[i].r = dmx_slave.getChannelValue(3*i+31+DMX_CHNLS);
  leds2[i].g = dmx_slave.getChannelValue(3*i+32+DMX_CHNLS);
  leds2[i].b = dmx_slave.getChannelValue(3*i+33+DMX_CHNLS);
 // LED group in i position of third bar
  leds3[i].r = dmx_slave.getChannelValue(3*i+61+DMX_CHNLS);
  leds3[i].g = dmx_slave.getChannelValue(3*i+62+DMX_CHNLS);
  leds3[i].b = dmx_slave.getChannelValue(3*i+63+DMX_CHNLS);
 // LED group in i position of fourth bar
  leds4[i].r = dmx_slave.getChannelValue(3*i+91+DMX_CHNLS);
  leds4[i].g = dmx_slave.getChannelValue(3*i+92+DMX_CHNLS);
  leds4[i].b = dmx_slave.getChannelValue(3*i+93+DMX_CHNLS);
}// Once updated, refresh LEDs and hold on for 30 ms. FastLED.show(); delay(30);
}
——————————————————————————————————————-
The sketch is really simple. It uses the Conceptinetics library, which handles all DMX functionality and FAST_SPI LED2 library which manages all digital LED strip functionality. In the sketch above, we can add or remove LED bars and use another PIN definition in order to connect DATA pin of digital LED strips to Arduino Board, in this case we have used pins 9, 10, 11 and 12. Remember that Power supply lines of LED strips will be directly connected to AC/DC converter, not to Arduino Board.
Now, using this simple device, your LED installations will be cheaper and easier to handle and, the best of all, you can continue using your usual software to manage your shows.
Thank you very much for your interest and have fun!!!
Kike Ramírez
Twitter: @ERamírez_
WARNING: This is a non-commercial, experimental project. The use of this device in critical installations without an exhaustive set of certified testing and without the required electrical safety precautions is absolutely beyond vjspain.com responsability. In case you are not experienced in electrical works, please, don’t do it by your own. Please, better ask someone experienced for help.
LICENSE: Esta obra está bajo una licencia de Creative Commons Reconocimiento-CompartirIgual 3.0 España.


